 BOUNCE A RAW EGG. THEN TURN IT BLUE AND BOUNCE IT SOME MORE!
This activity has been done in every science classroom in the country, but that is because it is SO COOL. And you can do it right in your own kitchen just in time for Easter with materials you already have in your fridge and pantry. Everyone in the family will love experimenting with ‘the bouncing egg’ and you will never look at Easter egg decorating the same again!
LEARN SCIENCE VOCABULARY:
Yolk – the yellow part inside the egg. It is there to feed a growing embryo IF the egg was fertilized (eggs from the grocery store are NOT fertilized and cannot hatch into a chick!).
Membrane – the very thin covering under the shell of an egg. Our skin is also a membrane, and there are also thinner membranes lining our internal organs.
Osmosis – the process of a liquid (like water) moving through a membrane to create equal concentrations of materials on both sides.
MATERIALS NEEDED:
- Eggs (brown eggs are fun to use because the darker color of the shell helps you see it as it comes off)
- White vinegar
- Cups (just large enough for your egg)
- Food coloring
- Water
- Corn Syrup (optional)
HOW TO MAKE IT: (Don’t be too shocked at how easy this is to do…)
- Place an egg in a cup and pour vinegar to just cover the egg. (You will probably want to do 2 or more eggs so you have plenty to experiment with!). You should immediately start seeing bubbles coming off the shell – this is the Carbon Dioxide being released in the chemical reaction as the vinegar breaks down the egg shell.
 Cover the egg with vinegar.
 You will soon begin to see the shell coming off the egg!
 - Let the egg sit for about 48 hours (or longer…some say to change the vinegar after a day, but I was too busy to remember that and the eggs turned out fine anyway!) Have the kids check it periodically and make observations (use senses of sight, smell and touch) about what is happening to the egg. What do they think will happen to the egg when all of the shell is removed?
- After 48 hours or so, carefully remove the egg from the vinegar with a slotted spoon.

Remove the egg carefully. - Rinse it under warm water, gently rubbing the surface to remove the rest of the shell covering. Kids can definitely help with this part. (The naked egg is a lot sturdier than you would think…but if they squeeze it too hard, it will burst!)
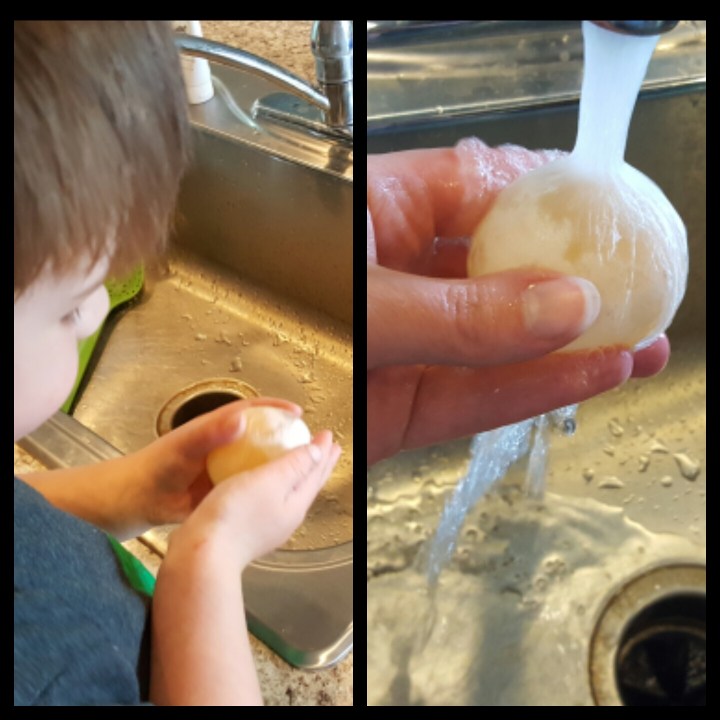
Rinse the egg in warm water, rubbing gently to remove the rest of the shell. - Get out a brownie pan or something similar (so your naked egg doesn’t roll onto the floor) and hold the egg about 3-4 inches above the pan. Drop it and watch it bounce!
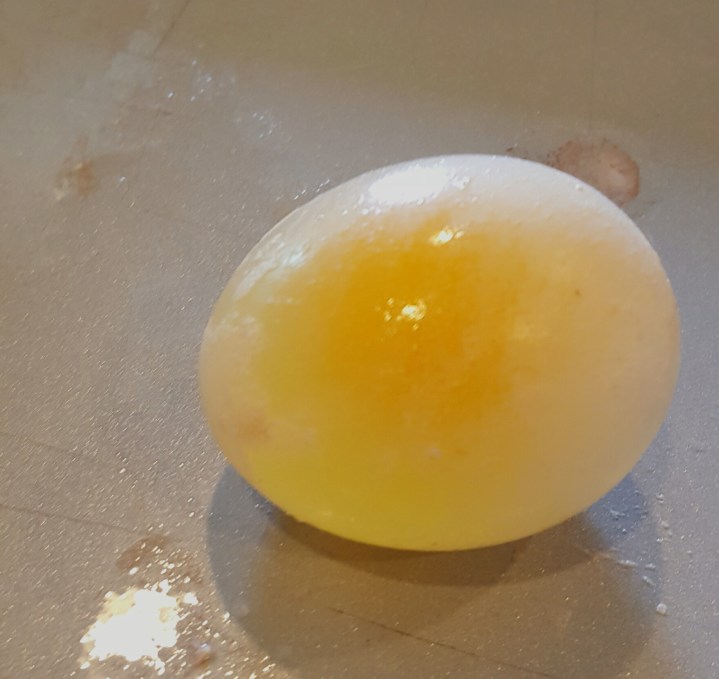
You can clearly see the yolk inside the egg! - Have kids make observations about the egg and the MEMBRANE that holds it together. You will also be able to see the YOLK fairly clearly inside, especially if you hold the egg up to a light.
GOING FURTHER:
You can color your naked eggs by placing them into a cup of water tinted with food coloring. After about 6 hours take your eggs out and see their vibrant colors! The colored water has actually permeated through the egg MEMBRANE through the process of OSMOSIS, coloring the inside of the egg as well.


If you want to keep going with this awesome activity, put your naked and colorful eggs into a cup and cover them with corn syrup. Let them sit overnight and observe what happens!


The water from inside the egg has moved out into the cup through the process of OSMOSIS. You will be able to see the water floating on top of the corn syrup in the cup.


AND THEN… you can turn them back into big rubbery eggs by soaking them in water again! The fun seriously never ends with this one.

THE SCIENCE BEHIND IT:
Removing the Shell: Vinegar (a.k.a. acetic acid if you want to get science-y) breaks down the eggshell (made of a material called calcium carbonate) through a chemical reaction that releases Carbon Dioxide gas (which you can see in the form of bubbles coming off the egg as soon as it hits the vinegar). This is very similar to how acidic food and drinks can break down tooth enamel over time! [Check out Bubbly Designs: a baking soda and vinegar activity if you want to learn more about chemical reactions with vinegar.].
Coloring, Growing, and Shrinking the Egg: The egg will get bigger and absorb color as it soaks in the cup of colored water because some of the water from the vinegar is moving into the egg through the its MEMBRANE (this is called OSMOSIS). Water will move in or out of a MEMBRANE in order to equalize the concentrations of salts and other materials on both sides of that MEMBRANE. Because corn syrup has a high concentration of these materials, the water from inside the egg moves out of the MEMBRANE and into the cup of corn syrup, causing the egg to appear shrunken and wrinkly! When you put it back in a cup of clear water, OSMOSIS works the other way and water moves back into the egg.

Oh my, this looks like a fun and teachable experiment! Will surely do it this weekend 💜
http://www.babblingbeautyblog.com
LikeLike
Thanks for your comment! Get your eggs soaking now so they are bouncing by the weekend! :). And post some pics on how it goes…
LikeLike
Ohhh this looks so cool and fun, but I am vegan..I don’t think I bring myself to use an egg this way. Maybe I can track down a farmer who I know treats his chickens well and give it a shot, haha.
LikeLike
This is experiment is so cool. I can’t wait until my kids get old enough to try it with them.
LikeLike
Thanks for your comment! I would say by 3 years old they can follow directions well enough to bounce the eggs and enjoy watching them grow and shrink…just be sure you can keep the mess contained, because when the eggs finally pop it can get a bit gross! 🙂
LikeLiked by 1 person
We’re almost there, my kiddos are 1 & 2. I think I would enjoy doing it now in my own lol.
LikeLike
This looks so fun! I never got to do this school but I’ll definitely try this out when my daughter is a little older. Thanks for sharing at #fridayfrivolity! Xx
LikeLiked by 1 person